Using The Service
Due to data transmitted via MQTT being volitile some data may not be persisted across reconnections, network interruptions, and/or service outages.
Requirements
As explained in the Authentication page, you will need to request a set of Client Credentials from an authorized reseller. Once you have the Client ID, Client Secret, and API Key you can start building.
Getting an Access Token
To get an Access Token, perform a
https://auth.weightron.cloud/oidc/token providing the grant_type,
client_id, and client_secret in the body. A scope can also be provided if necessary.
An API Key is not required for the token request.
- ✉️ Postman
- 🧀 JavaScript
When using Postman, set the body type to x-www-form-urlencoded and add each key required and its value.
Under the Authorization tab, select No Auth.
Under the Authorization tab, you can select OAuth 2.0 and enter your credentials under Create New Token.
Variables are used in the example below to hide the ID and Secret values.

All code examples on this page are for demonstration purposes and support will not be provided.
async function getAccessToken() {
    const clientId = "<YOUR_CLIENT_ID>";
    const clientSecret = "<YOUR_CLIENT_SECRET>";

    let req = await fetch("https://auth.weightron.cloud/oidc/token", {
        method: "POST",
        body: `grant_type=client_credentials&client_id=${clientId}&client_secret=${clientSecret}`,
        headers: {
            "Content-Type": "application/x-www-form-urlencoded",
            "Cache-Control": "no-cache",
        },
        mode: "cors",
    });

    if (!req.ok) throw new Error("Error getting access token: " + req.status + " (" + req.statusText + ")");

    return await req.json();
}
The above example includes basic error handling. See Error Responses for more info on handling errors.
A JSON response is returned containing the Access Token and the number of seconds until token expiry.
{
    "access_token": "<ACCESS_TOKEN>",
    "expires_in": 300,
    "token_type": "Bearer"
}
Using an Access Token
An access token is required for authentication with our MQTT service. The access token is passed as the password when making a connection to the MQTT broker.
- 💻 MQTT Explorer
- 🧀 JavaScript
MQTT Explorer is a comprehensive MQTT client that provides a structured overview of your MQTT topics and makes working with services simple. You can download MQTT Explorer here.
Using MQTT Explorer you can test your connection to the MQTT service and publish/subscribe to topics. To start, first create a new connection. and enter the following details:

| Field | Value | Description |
|---|---|---|
| Name | n/a | A name for the connection, not required. |
| Validate Certificate | true | This should be enabled when using MQTT Explorer. |
| Encryption (tls) | true | This should be enabled when using MQTT Explorer. |
| Protocol | ws:// | As encryption is required to connect to our MQTT service, secure WebSockets via wss:// (ws:// in MQTT Explorer) must be used. |
| Host | mqtt.weightron.cloud | The URL of our MQTT service. |
| Port | 443 | The port to use to connect to the MQTT service. |
| Basepath | mqtt | The basepath to be appended to the Host. |
| Username | Your Application ID | The username is your Application ID (not Client ID), if you have any issues with the Application ID, please Contact Us. |
| Password | Your Access Token | The password is the access token received from the previous step. |
After entering the details above, click ADVANCED and enter the topic you want to subscribe to, as per our Subscribing
article.
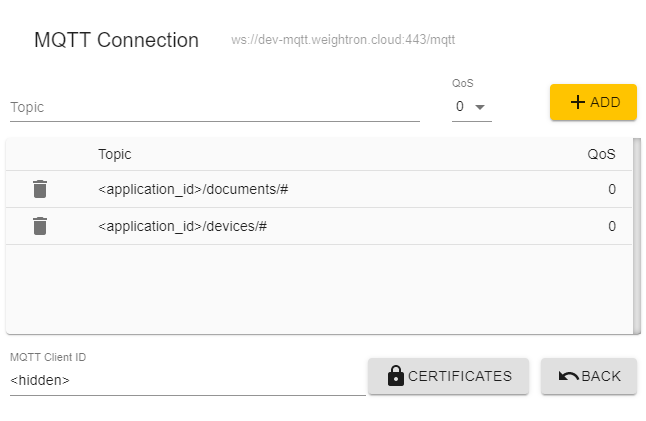
Click the ADD button to add the topic to the list and when done click BACK to return to the connection screen.
You can now click CONNECT to connect to the MQTT service. If successful, you will see a green connection status in the top right, as well
as the topics you have subscribed to if data is being received or has persisted internally.
All code examples on this page are for demonstration purposes and support will not be provided.
An addtional library is typically required to connect to the MQTT service. You can install the library using npm:
npm install mqtt
As encryption is required to connect to our MQTT service, secure WebSockets via wss:// (ws:// in MQTT Explorer) must be used.
const mqtt = require("mqtt");

const applicationId = "<APPLICATION_ID>";
const accessToken = "<ACCESS_TOKEN>";

// Connect to the MQTT broker using secure WebSocket protocol
const client = mqtt.connect("wss://mqtt.weightron.cloud/mqtt", {
    username: applicationId,
    password: accessToken,
    reconnectPeriod: 5000,
    protocolVersion: 5,
});

// Handle connection events
client.on("connect", () => {
    console.log("Connected to MQTT broker");

    // Subscribe to the topic for receiving messages
    client.subscribe(applicationId + "/documents/#", (err) => {
        if (err) console.error(`Error subscribing to topic: ${err.message}`);
    });
});

// Handle subscription events
client.on("message", (topic, message) => {
    console.log(topic);
    console.log(message.toString());

    // Disconnect from the MQTT broker after receiving a message
    // This is optional and can be removed if you want to keep the connection open
    client.end();
});
| Field | Value | Description |
|---|---|---|
| Username | Your Application ID | The username is your Application ID (not Client ID), if you have any issues with the Application ID, please Contact Us. |
| Password | Your Access Token | The password is the access token received from the previous step. |
Running your JavaScript code should produce the following output in the console. If any messages are received on the subscribed topic, they will be printed to the console as well.
Connected to MQTT broker
The above example only includes basic connection and subscription handling. We recommend reading the documentation for the library you are using to understand how to handle connection errors, disconnections, and other events. You can find the MQTT.js Documentation here.